Development
Transforms are the core of the data processing pipeline. They are predominantly written in Python, with some developed in C++. Most transforms take a volume as an input, do some operations on that volume, and output a volume. In Python these are typically viewed as NumPy arrays where they are a view of the native C++ memory used by Tomviz.
Tomviz supports two APIs for writing Python transforms: the legacy operator
API (tomviz.operators) and the new node API (tomviz.nodes). Both
are fully supported and can be used for custom transforms.
Legacy Operator API
Simple Transform
This transform can be created by clicking on Data Transforms >
Data Management > Custom Transform. It is one of the simplest transforms
possible - all simple transforms define a transform function, import the
necessary modules, and then get the data as an array.
def transform(dataset):
    """Python transform that operates on the input array"""

    import numpy as np

    # Get the current volume as a numpy array.
    array = dataset.active_scalars

    # This is where you operate on your data, here we square root it.
    result = np.sqrt(array)

    # This is where the transformed data is set, it will display in tomviz.
    dataset.active_scalars = result

    # Optionally set the voxel sizes (in physical units)
    dataset.spacing = [5, 10, 7]
The dialog in Tomviz enables editing of Python transforms in the source tab. Clicking Apply will apply the code in the editor leaving the dialog open; clicking OK will apply the transform and close the dialog.
Subclassing tomviz.operators.Operator
Tomviz provides an operator base class that can be used to implement a Python
transform. To create a transform, subclass and provide an implementation of
the transform method.
import tomviz.operators

class MyOperator(tomviz.operators.Operator):
    def transform(self, dataset):
        # Do work here
Subclassing tomviz.operators.CancelableOperator
To implement a transform that can be canceled, derive from
tomviz.operators.CancelableOperator. This provides a canceled property
that can be checked to determine if the user has requested cancellation.
import tomviz.operators

class MyCancelableOperator(tomviz.operators.CancelableOperator):
    def transform(self, dataset):
         while(not self.canceled):
            # Do work here
Operator progress
Instances of tomviz.operators.Operator have a progress attribute for
reporting progress. Set progress.maximum for the total steps,
progress.value for the current step, and progress.message for a status
message.
import tomviz.operators

class MyProgressOperator(tomviz.operators.Operator):
    def transform(self, dataset):
        self.progress.maximum = 100
        for i in range(100):
            # Do work here
            self.progress.value = i + 1
New Node API
Tomviz 3.0 introduces a new node-based API via tomviz.nodes. This API aligns
with the new pipeline model and provides explicit port-based input/output.
SourceNode
A SourceNode produces output data without any inputs. Subclass
tomviz.nodes.SourceNode and implement the produce method:
import tomviz.nodes
import numpy as np

class MySphere(tomviz.nodes.SourceNode):
    def produce(self, radius=10.0, shape_x=100, shape_y=100, shape_z=100):
        ds = self.create_dataset()

        # Generate a sphere
        x, y, z = np.mgrid[:shape_x, :shape_y, :shape_z]
        center = np.array([shape_x, shape_y, shape_z]) / 2
        dist = np.sqrt((x - center[0])**2 + (y - center[1])**2 +
                       (z - center[2])**2)
        volume = (dist <= radius).astype(np.float32)

        ds.active_scalars = volume
        ds.spacing = (1.0, 1.0, 1.0)
        return {'output': ds}
Parameters are passed as keyword arguments from the JSON description file. The return value is a dictionary mapping output port names to Dataset objects.
TransformNode
A TransformNode consumes input data and produces output data. Subclass
tomviz.nodes.TransformNode and implement the transform method:
import tomviz.nodes

class AddConstant(tomviz.nodes.TransformNode):
    def transform(self, inputs, constant=0.0):
        ds = inputs['volume']
        ds.active_scalars = ds.active_scalars + constant
        return {'volume': ds}
The inputs parameter is a dictionary mapping input port names to Dataset
objects. Return a dictionary mapping output port names to the results.
Progress, Cancellation, and Completion
Both SourceNode and TransformNode provide the same progress/cancellation
interface as the legacy API:
class MyNode(tomviz.nodes.TransformNode):
    def transform(self, inputs, **params):
        self.progress.maximum = 100
        for i in range(100):
            if self.canceled:
                return None
            # Do work
            self.progress.value = i + 1
        return {'volume': inputs['volume']}
Dataset API
The Dataset object provides these properties and methods:
active_scalars- Get/set the active scalar array (NumPy ndarray)active_name- Get/set the name of the active scalarnum_scalars- Number of scalar arraysscalars_names- List of all scalar array namesscalars(name)- Get a scalar array by nameset_scalars(name, array)- Add or update a scalar arrayremove_scalars(name)- Remove a scalar arrayspacing- Voxel spacing (x, y, z) tupletilt_angles- NumPy array of tilt anglestilt_axis- Axis index for tilting (0, 1, 2, or None)scan_ids- NumPy array of scan IDsdark/white- Dark/white field calibration datafile_name- Original filenamemetadata- Arbitrary metadata dictionaryempty_copy()- Create a new dataset with same geometry but no arrays
Generating the user interface automatically
Python transforms can take parameters governed by a JSON description file. The JSON file consists of:
name- The transform name (no spaces).label- The displayed name in the UI.description- Description of what the transform does.parameters- A JSON array of parameter definitions.
Each parameter has:
name- Must be a valid Python variable name.label- Displayed name in the UI.type- One of:bool,int,double,enumeration,xyz_header,file,directory.default- Default value.minimum/maximum- Value bounds.precision- Decimal digits fordoubleparameters.options- Array of{"Name": index}objects forenumerationtype.
Examples of parameter descriptions:
bool
{
  "name" : "enable_feature",
  "label" : "Enable Feature",
  "type" : "bool",
  "default" : false
}
int
{
  "name" : "iterations",
  "label" : "Number of Iterations",
  "type" : "int",
  "default" : 100,
  "minimum" : 0
}
Multi-element int
{
  "name" : "shift",
  "label" : "Shift",
  "type" : "int",
  "default" : [0, 0, 0]
}
double
{
  "name" : "rotation_angle",
  "label" : "Angle",
  "type" : "double",
  "default" : 90.0,
  "minimum" : -360.0,
  "maximum" : 360.0,
  "precision" : 1
}
enumeration
{
  "name" : "rotation_axis",
  "label" : "Axis",
  "type" : "enumeration",
  "default" : 0,
  "options" : [
    {"X" : 0},
    {"Y" : 1},
    {"Z" : 2}
  ]
}
Defining Results and Child Data Sets
Transforms may produce additional datasets described in the JSON:
results- Array of{"name": "...", "label": "..."}objects for additional output datasets.children- Array describing child datasets that accept further transforms.
Results and children are returned from the transform function as a dictionary
mapping names to datasets.
Command line execution of pipeline
A pipeline can be executed from the command line without the Tomviz GUI. The
tomviz-pipeline package is available on conda-forge:
conda install -c conda-forge tomviz-pipeline
Alternatively, install from the Tomviz source repository:
pip install <tomviz_repo_directory>/tomviz/python/
Then execute a saved state file:
tomviz-pipeline -s <path_to_state_file> -o <path_to_write_output_emd>
The input data source can be overridden with the -d option, enabling batch
processing: save a pipeline as a state file in the GUI, then run it on
multiple datasets from a script:
for f in dataset_*.emd; do
    tomviz-pipeline -s my_pipeline.tvh5 -d "$f" -o "output_${f}"
done
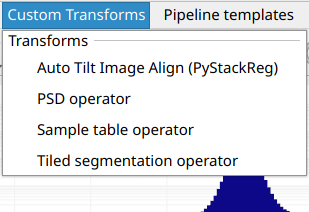
Custom Transforms
Tomviz comes with many built-in transforms. To add local transforms, place Python files in one of these directories:
~/tomviz/~/.tomviz/
The Custom Transforms menu re-scans these directories every time you open
it, so new files appear immediately without restarting the application.
Edits to existing files are also picked up on next use, since the script is
loaded from disk when the transform is applied.
The file name becomes the menu entry name (e.g., my_thing.py appears as
my_thing). Add a JSON file with the same base name to customize the
displayed label and add input parameters:
{
  "name" : "Custom Thing",
  "label" : "Operate on data",
  "description" : "Apply my special operation to the data..."
}
Custom Transforms Path
The search directories can be overridden by setting the
TOMVIZ_CUSTOM_TRANSFORMS_PATH environment variable. It accepts multiple
directories separated by : (Linux/macOS) or ; (Windows).
Apply transforms
Custom transforms appear in the Custom Transforms menu and can be applied
just like built-in transforms.
User Input for Transforms
Custom transforms can accept user input via JSON metadata. For example, to let the user set a parameter:
{
  "name": "Fancy Square Root",
  "label": "Classy Square Root",
  "description": "A configurable square root operator.",
  "parameters": [
    {
      "name": "number_of_chunks",
      "label": "Number of Chunks",
      "type": "int",
      "default": 10,
      "minimum": 1,
      "maximum": 1000
    }
  ]
}
Automatic Multi-Array Processing
By default, all transform functions are automatically wrapped to apply the transform to every scalar array in the dataset. This means datasets with multiple arrays (e.g., XRF elements) are processed automatically.
To disable this (e.g., for transforms that handle multi-array logic internally), add to the JSON:
{
  "apply_to_each_array" : false
}
External Subprocess Execution
Individual transforms can execute in an external subprocess with a separate Python environment. This is useful for transforms that depend on libraries that would conflict with Tomviz’s built-in environment, or that require specialized packages such as AI/ML frameworks.
The external environment only needs the tomviz-pipeline package installed
(available from conda-forge). Beyond that, you can install any packages
you need - PyTorch, TensorFlow, specialized reconstruction libraries, etc.
The transform runs in a completely independent Python process, so there are
no dependency conflicts with Tomviz itself.
External execution can be configured in two ways:
Via the Execution tab: Every transform’s configure dialog includes an
Execution tab with an executor dropdown. Select External and specify the
path to a Python environment containing tomviz-pipeline. This lets you
configure external execution at runtime without modifying any files.
Via JSON metadata: Set tomviz_pipeline_env in the transform’s JSON
description file to make external execution the default:
{
  "name": "MyAITransform",
  "label": "AI Denoise",
  "tomviz_pipeline_env": "/path/to/conda/envs/ai_env"
}
To set up an external environment:
conda create -n my_transform_env python=3.10
conda activate my_transform_env
conda install -c conda-forge tomviz-pipeline
pip install torch  # or any other packages your transform needs
Conditional Visibility with visible_if
Parameters can be conditionally shown based on other parameter values:
{
  "name" : "num_iter",
  "label" : "Number of Iterations",
  "type" : "int",
  "default" : 100,
  "visible_if" : "algorithm == 'mlem' or algorithm == 'ospml_hybrid'"
}
Supports and and or operators for complex conditions.
Accessing multiple channels
Datasets can contain multiple scalar arrays. Access them by name:
def transform(dataset):
    import numpy as np

    array = dataset.scalars(name='Tiff Scalars')
    dataset.active_scalars = array
Iterate through all channels:
def transform(dataset):
    import numpy as np

    channel_sum = None
    for name in dataset.scalars_names:
        channel = dataset.scalars(name)
        if channel_sum is None:
            channel_sum = channel
        else:
            channel_sum += channel

    dataset.active_scalars = channel_sum